
The Accounts tool (previously called the People tool) has functions for you to manage user accounts. When you open the Accounts tool, you'll see a complete list of all user accounts on your Teamworks AMS site. You can sort the list with the Sort button or filter the list by:
- First name
- Middle name
- Last name
- Email address
- Username
- UUID (universally unique identifier)
- Language
- Active status in AMS.
As an AMS administrator, you can use the Accounts tool to take the following actions:
- Create new user accounts.
- Make adjustments to user account attributes.
- Assign builder and/or administration access to a user account.
- Initiate a password reset for one or more user accounts.
- Troubleshooting multi-factor authentication for a user account.
- Generate and send a magic link to a user to login with.
- Duplicate a user account.
- Merge two user accounts.
- Whitelist user accounts.
- Deactivate a user account.
If you're an AMS team administrator, you're only able to modify user accounts for users who are in groups or roles that you have administrator access to. You're also not able to import, duplicate or merge user accounts.
To edit an existing user account, search for and select the user account from the list. Alternatively, hover over the user account in the Accounts tool to access the More menu then select Edit. From this menu, you can also Duplicate and Delete a user account.
If your site is on an enterprise server and account linking is enabled in the Shared sites tool, you may be able to link user accounts to other sites from the menu.
We strongly recommend avoiding deleting user accounts unless absolutely necessary. Deleting an account is irreversible and will result in the loss of all data saved against that user’s account. Instead, we recommend the following actions:
- If the account is a duplicate of another account, you can merge accounts.
- If the user is no longer active within the organization, you can deactivate the account.
Create user accounts
Everyone who logs into AMS must have a user account. There are three ways that user accounts can be generated:
- An administrator creates a user account for an individual.
- An administrator creates multiple user accounts with an import file.
- Users register for their own user accounts via public registration.
Public registration must be enabled within the Application details to be applicable. For more information, see our article on Registering for an AMS account.
Linking accounts on an enterprise server
If your site is on an enterprise server, it may be possible to link user accounts between sites on the server. This means that users can log into each site with the same credentials.
When creating new user accounts on an enterprise server, you should find out whether the user account already exists on another site and can be linked, rather than having a duplicate account created for them. If they require an unlinked account, a new account can be created with a unique email address and username.
Site administrators and SuperAdmins can see but not edit all user accounts on the enterprise server within the Accounts tool. If an account is not linked to the currently loaded site, it will be grayed out. To link an account to the current site, it needs to be linked from another site where it does exist.
Individual accounts can be linked to other servers by selecting Link to and selecting the sites that the account should be linked to.
Create a new user account for an individual
To create a new user account, select New and fill out the user account fields in the Account tab. The following fields are required (marked with a red asterisk):
- First name
- Last name
- Sex
- Date of birth
- Language
- Username
- Email address
It can be helpful for the onboarding process to use a common naming convention for usernames, for example firstname.lastname (e.g. jamie.anderson). For instances where there are two user accounts with the same first and last names, you could append a number to the username (e.g. jamie.anderson2).
Optional fields include middle name, nickname, phone numbers or addresses.
When creating a new account, Self-service password creation is enabled by default - this will send an email to the user when you save their account and prompt them to set a password to log into AMS. The link will be valid for 24 hours. If you disable this setting and have access to the Set custom passwords system permission in your role, you can enter a custom password for the user.
By default, newly created users will be activated so they can log into AMS. Unchecking the Activate account setting will deactivate the user account. For more information, see Deactivating a User Account.
To create a new user account, follow these steps:
- Log into the administration interface.
- Select the Accounts tool from the administration interface.
- Use the search function to check that the user you want to create does not already exist within AMS.
- Select New.
- Fill out the required fields, which are marked with a red asterisk.
All user accounts must have unique email addresses and usernames.
- Select the Save changes button.
- Switch to the Groups tab. Add the user to any groups they need to be in and assign the appropriate access level (Athlete, Coach or Admin).
- Switch to the Roles tab. Add the user to any roles they should have.
Updates in the Favorites, Groups and Roles tabs are saved automatically.
Import user accounts
The import process is extremely useful when you need to create multiple new users at once. It is necessary to have all the information that is required using the manual method, but in this case, a CSV file can be used to tabulate that information for multiple users. It is also possible to include a user’s role and group information in the import file.
Using the correct formatting in your CSV file is a critical step in this process. You must have columns for users’ first and last names, usernames, email addresses, and dates of birth. It is possible to use a temporary or fake email if you don't know someone's email address and need to put a placeholder. We recommend using firstname.lastname@smartabase.com as this ensures that performance alerts, messages, or other potentially confidential communications will not go to a location that your organization doesn't control.
To import user accounts, follow these steps:
- Log into the administration interface.
- Select the Accounts tool from the administration interface.
- Select Import.
- Upload a CSV file that contains data for new accounts organized into the required columns as well as any optional columns you need.
- Once the CSV file is uploaded, the next screen will ask you to map the columns in that file to the fields in the system.
- Select the matching column for each field from the drop-down list next to each field.
- For dates, ensure that you select the format that you used when creating the CSV file.
- If you have included columns specifying which group users are members of, pick these columns for the Name drop-down in the Groups section. Any groups that don’t already exist on the site will be created and users added as members.
- A description is not necessary at this stage, but if you decide later you want to have a description for a group, you can edit the group using the Groups tool.
- If you have included columns specifying which group users are coaches of, pick these columns for the Name dropdown in the Groups As Coach section. Any groups that don’t already exist on the site will be created and users added as coaches.
- If you have included columns specifying which role/s will be applied to users, pick these columns for the Name drop-down field in the Roles section.
- Check the table at the bottom of the mapping page to confirm that your file is mapped correctly.
- Click Next.
- A message will appear confirming that users have been imported successfully. Select Finish to finalize the migration.
If a user account in the CSV file has the same username or email address as an account that already exists on the site, the account in the CSV file will be mapped to the existing account. The existing account will retain its account details but will be added to any roles and groups that the user account was assigned to in the CSV file.
Adjust user account attributes
Administrators can update other users' account details, set their favorite events and dashboards, update their language settings and other details using the Accounts tool. Please be aware that this will override any settings that someone might have set for themselves, including favorites and language settings.
Open the user account from the Accounts tool. From the Account tab, you can update the user’s profile details and account settings. After updating any account details, use the Save changes button to confirm the changes.
If a user is linked to other sites on an enterprise server, any changes to their account details, username, email address, password and contact details will be reflected on all sites.
Groups that the user is part of and their access level is shown in the Groups tab. This can be managed at a group level within the Groups tool or at an individual level here. To add the user to additional groups, select Add groups. Use the Access dropdown to change the level of access within the group. To remove the user from a group, check the box next to the group and select Remove.
The Roles tab operates similarly to the Groups tab, except for the access level.
Assign builder and/or administration access to a user account
If you're a SuperAdmin or an administrator with a role containing the Assign builder/admin access system permission, you can provide a user account with access to the builder and/or administration interfaces or allow the account to bypass multi-factor authentication, terms acceptance and single sign-on. If applicable, these options will become available at the bottom of the Account tab after selecting Save changes.
On an enterprise server, builder and administration access is specific to each site. For example, a user account can be linked to multiple sites but may only have builder access on one of those sites.
Initiate a password reset
Any time you go through the password reset process for other users, you'll need to verify your identity by completing multi-factor authentication. So it's important, as an administrator, to make sure that your own user account is set up for multi-factor authentication.
You can initiate a password reset for a single user account from that person's account by opening the user's account from the Accounts tool and selecting Reset password in the Accounts tab.
Alternatively, you can initiate a password reset for multiple users from the Accounts tool by ticking the relevant user accounts, then selecting Reset password.
When you initiate a password reset, you can choose whether to set a custom password (if you have the relevant system permission) or send a password reset link via email. Emails will be sent from noreply@smartabase.com. You can also choose how long the password reset link should be valid for in minutes, hours or days after selecting Send password reset link.
Setting a custom password means you can input the password yourself and the user isn't required to reset their own password. When you use this ability, you need to have a secure method for communicating the password to the owner of the affected user account.
Troubleshooting multi-factor authentication for a user account
Once a user has authenticated their AMS account using a device, it’ll appear in the list of Registered Devices.
If multi-factor authentication is enabled on your AMS site, you can assist someone who is unable to receive a multi-factor authentication code. Typically they will receive a code either by email, SMS or use an authentication app but if they can’t access their code for any reason, an administrator has a couple of options to assist them with logging in.
Users who are linked to multiple sites on an enterprise server require separate MFA setups for each site. If troubleshooting MFA for their account using the methods below, ensure you perform the steps on the site they're trying to log into.
Share a single-use multi-factor authentication key
If a user is unable to receive an authentication code, an administrator can provide a single-use backup code. To access this code, open the user’s account in the Accounts tool and select View backup codes under Login and security. The code you can access here is one of their account’s backup codes. Because you only have access to one of a person’s backup codes as an administrator, after accessing their code you should instruct them to generate new backup codes (as per the instructions in the multi-factor authentication article). If they don’t do this, they’ll still have access to their remaining backup codes but you won’t be able to provide one for them in the future.
Reset the multi-factor authentication key
An MFA key is used when a person wants to complete authentication using a code generated by an authentication app. Neither site nor team administrators can see the MFA key in AMS as it is only visible to the account owner. However, if someone has MFA enabled for their account and they’re unable to receive the codes, site administrators can reset the MFA key associated with the user’s account. Team administrators are not able to perform this function. By resetting the MFA key, the user will no longer be able to generate valid codes using the previous method and they’ll be prompted to re-enable MFA the next time they log into AMS. They will also have to delete the obsolete account from the authenticator app when they add the new one.
To reset the MFA key, open the user’s account in the Accounts tool and select Reset MFA under Login and security.
Generate and send a magic link to a user to login with
Magic links can be used to make onboarding users into AMS easier. Anyone with administration access can generate and send a magic link, including team administrators. You can send a magic link to someone by finding their account in the Accounts tool and clicking on the Generate login link button below their account details. Clicking this will send an email to the person that includes a magic link. Tapping the link will redirect the person to their AMS site on a web browser or open the AMS app on their mobile device. They will then be prompted to create a password to log in.
Duplicate a user account
Duplicating a user account is useful, for example, in situations where an AMS site includes multiple clubs. When an athlete is transferred from one club to another their account can be duplicated, with the original used by the new club going forward, while the duplicate is kept by the first club. New data can’t be added for the duplicate, nor can the athlete log in as the duplicate account; however, the data up until duplication remains available for the original club to maintain reporting continuity. When the original club no longer requires the duplicate data, it can be removed with no impact on the athlete’s usual account used by the new club.
The screenshot below shows the user duplication feature.

To duplicate a user account, follow the steps below:
- Search for the account in the Accounts tool and hover over the account to view more options.
- Select the more options button, then select Duplicate.
- Confirm the account and details that will be duplicated, then select Duplicate.
A copy of the user's account will be created and a confirmation message will be sent to your email address.
It is not possible to edit a duplicate user account from the Accounts tool. To move a duplicate user account into a group, you must go to that group and add the account there. If a duplicate account needs to be deleted, you will need to contact your organization's site owner to do this for you.
If you duplicate a user who is linked to multiple sites on an enterprise server, the duplicate account will also be linked to the same sites as the original.
Merge a user account
When you need to merge two user accounts into one, you can use the option called Merge users in the Option menu. This function is available to administrators with a role containing the Merge users system permission.
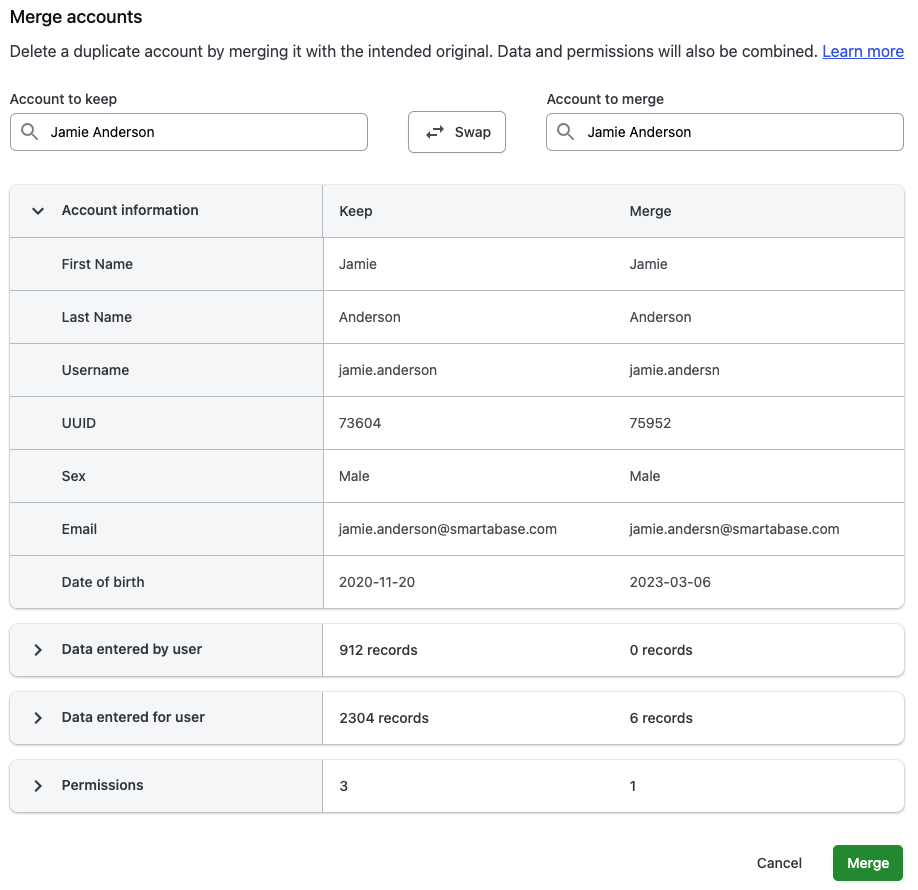
You can use the Merge option in the toolbar if you need to merge two user accounts into one. This may be the case if a duplicate account was created via user import or if a user registers for and enters data against a new user account when an account already existed. This function is available to administrators with a role containing the Merge users system permission.
When merging users, the duplicate user account is removed from the system and any event form data or profile data entered for or by that account is added to the actual user account. The permissions (groups, groups as coach, and roles) for the duplicate user are also added to the actual user’s permissions. It is not possible to undo a user merge.
To merge a user account, follow these steps:
- Log in to the administration interface.
- Select the Accounts tool from the administration interface.
- Search for and tick the user accounts to be merged. (Note that you can only select two accounts to merge).
- Select Merge from the toolbar.
- Confirm that both selections are correct and the second selection is the account to be permanently removed from the system. If the accounts are the wrong way around, select Swap to switch them over.
- Select the Merge button.
- The accounts are now merged.
It is not possible to unmerge an account, so please be absolutely sure that you’re merging the correct accounts.
Because it is not possible to edit a user account created through the duplication process, it's also not possible to merge a duplicate account back into its original account.
On an enterprise server, you can only merge users that exist on the currently loaded site. If the user accounts exist on different sites, they need to be linked so that the merge can be performed on one site.
Whitelisting user accounts
If your site has user accounts set up to facilitate integrations with third-party software (using the AMS API), you might need to consider special exemptions. Features such as single sign-on (SSO), multi-factor authentication and terms documents can prevent the accounts that access the AMS API from performing the necessary tasks for the integration.
If these features are enabled on your site, the integration account can be whitelisted so that they are bypassed and the integration can be run. To whitelist an account,a site owner or SuperAdmin can enable Fast login in the advanced permissions to bypass MFA, terms acceptance and SSO. The audit trail records the activities of all whitelisted accounts for reference purposes in the case of inappropriate use.
Deactivating user accounts
If someone leaves the organization or no longer needs access to AMS, their account should be updated so that they can’t access any unauthorized data.
Administrators can delete a user account via the Accounts tool but in the majority of situations, it is better practice to deactivate an account. This is particularly important where data must be stored for a certain period of time before being deleted.
To deactivate a user account, select the account from the Accounts tool and untick the Active checkbox in their account details. Use the Save button to update your changes. Once an account has been deactivated, the user will be unable to log into the AMS site.
On an enterprise server, deactivating a user account that is linked to multiple sites will deactivate the account on all sites.
We also recommend removing all roles from a user account as an additional precaution to prevent unauthorized access to the site.
Deactivated users can still be accessed by coaches of the group they’re in, so you may also want to remove the user account from any groups they’re a member of and add them to a group of archived accounts. This will allow you to keep track of archived users and continue to access historical data if required.
To reactivate a user account, simply re-tick the Active checkbox in the user's account details and reassign relevant roles and groups to their account.