In some instances, an event form may contain a table to record data. Tables are used to capture information where multiple values are required for a single field, so each column represents a separate field.
Web
Mobile App
Athlete App
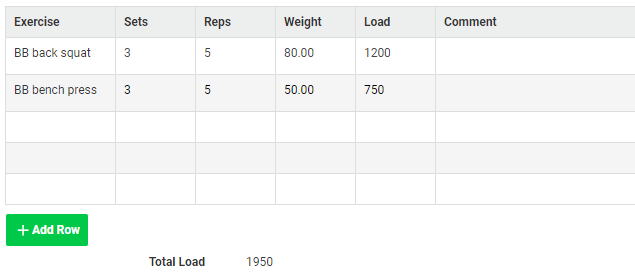
This example shows a table used in a strength and conditioning form. The first field in the table, on the left-hand side, is called Exercise and is a Database field. Each of the subsequent columns are fields that have also been set to appear in table format.
To edit the table values, select a cell within the table.
Some useful functions are available when entering data into a table:
- Clicking the Done button will take you to the next most appropriate cell for entering data; this can be the next cell to the right or the cell below.
- The Cancel button will deselect the current cell.
- The Clear button removes anything you have entered in the current cell.
- The Fill down button will take the data you have entered into the current cell and copy it to the remaining cells in the column. When you click Fill Down, a pop-up box appears with options for whether you want to copy the cell contents or the contents of the entire row. When selecting the option to copy an entire row you are also able to specify which row (or rows) you want to copy and which rows you want to copy them to.
- The Copy last button will copy the data from the cell immediately above the current cell into the current cell.
- The Paste from Excel button allows you to paste data from Microsoft Excel directly into the table. When you select this button a pop-up box appears with a blank field for you to paste the data you’ve copied from an Excel spreadsheet. For this to work you must have the data from Excel formatted in exactly the same way as the table columns. Be aware that how Excel displays data is not always the same as how it is stored, particularly with regard to decimal places, dates and times.
In the example below, you can see information from a strength training session in a table. You can swipe left and right to view more columns in the table.
To edit the table values, select a cell within the table or select the Edit button below the table. If the cell is for a calculation field, a calculation icon will be shown in the table header and you will be unable to click into that cell.
To move to the next cell (i.e. to the right), swipe across the screen to see the next field (if applicable) and tap the next cell. You can use the arrows at the bottom of the screen to select table cells above or below the selected cell.
There are a couple of options to add more table rows:
- Select + Add row directly below the table.
- In the footer bar, use the + and - buttons or enter the number of table rows you want to add, then select Add row/s.
To delete a table row, tap and hold the row number in the left column for the row to be deleted. In the pop-up, select Delete. You can only delete a table row during data entry; once the record has been saved, rows are unable to be deleted.
To copy data entered in a cell, tap and hold the cell to reveal some additional options:
- Copy the contents of the cell.
- Paste copied contents into the cell.
- Fill down the value to all rows below.
- Clear the contents of the cell.
You can also fill down and clear the entire row of data by performing the same tap-and-hold action on the table row number, instead of the cell.
If you are entering data into a table for a group, the Fill down and Fill down row options will only apply to the selected athlete’s data table; values will not be filled down for other athletes.
When you’ve finished editing the table, select the back icon (<) to return to the form.
In the example below, you can see information from a strength training session in a table. On the Athlete app, data fields are arranged vertically down the page and you swipe left and right to view the data rows.
To add a new table row, select the Add new entry button at the bottom of the table.
You can clear data from the table row by selecting the three horizontal dots above the table.
A table summary section is displayed above each table and shows the current table row number, the total number of rows and the first two field values from each row. You can hide the table and the table summary section by tapping Hide. All that will remain is the total number of table rows and the Add new entry button, which can be used to add a new table row. Tap Show to reveal the table again. The screenshot below shows the row number (one of four) and the values from the first two fields (Order and Exercise) in the table summary.
Selecting the symbol on the right of the header shows a summary of the table rows, including the first two values from each row. Select Review to show a summary of the table data in a non-editable view. To edit the table again, select Edit entry at the bottom of the table. You can also clear data from the table row by selecting the three horizontal dots above the table.
In some forms, table rows can be configured to lock after the record is saved. This means that the data entered into the table rows cannot be edited, but it can still be viewed. Table rows may be locked when sensitive data is entered into the form that should not be changed, such as a doctor’s treatment notes for an injury or illness. Depending on how the form is configured, table rows may lock as soon as the record is saved or there may be a delay of one to three days, during which time the values in the table row can still be edited.
It is important to note that once a table row has been locked, it cannot be unlocked.