
Option fields allow people to choose an answer to a question from a pre-defined list of possible options. When you build a form that has an option field, you define what the possible answers are by choosing a specific type of option field or by customizing the option list using the Options tab.

This article covers the following topics:
- Types of option fields.
- Ordering the option list.
- Scoring your options.
- Steps to create an option field.
- Setting up conditional options.
- Configuring importance indicators.
- Changing the options in a live form.
Types of option fields
There are nine option fields types:
- Single selection: allows the user to pick one option from a vertical or horizontal list of customizable question answers in the form of radio buttons.
- Tick: allows the user to tick a box or leave it empty. The unticked state is always associated with the first option on the list and the ticked state with the second option.
- Dropdown: allows the user to pick one option from a drop-down list of customizable question answers.
- Multiple selection: allows the user to pick multiple options from a vertical list of customizable question answers in the form of tick boxes.
- Search list: allows the user to pick one option from a hidden, customizable, list by entering text and picking a matching option.
- Slider: allows the user to pick one option from a horizontal sliding scale. The options visible underneath the slider can be limited via the slider options display property, which can help with neatly displaying a slider with a lot of options. You can choose to show all, alternating, first and last, or first, middle and last options.
- Rating: allows the user to pick from a specified number of stars. Note that options and scores cannot be assigned to each star; instead, each is automatically assigned a number from left to right (e.g. the third star will return a numerical score of three).
- True/false: allows the user to choose True or False.
- Yes/no: allows the user to choose Yes or No.
Note that Database fields can also be thought of as a type of option field.
We recommend that you avoid using True/false and Yes/no fields in favor of Single selection or Dropdown fields so that you can update the option list if required. If you want to change or add options for a True/false or Yes/no field, you would need to change the field type, which means exporting the data and re-importing it to the updated form.
Ordering the option list
It's important to keep in mind that the ordering of the option list affects the sorting behavior when people click the column headers in reports, Embedded reports, Embedded events or the Performance history. In each of these areas, the data will be sorted according to the option list order.
If the Best Value advanced property has been set, then this will also affect the sorting order based on which field has been selected as the best option and the direction of the scoring.
Setting up conditional options
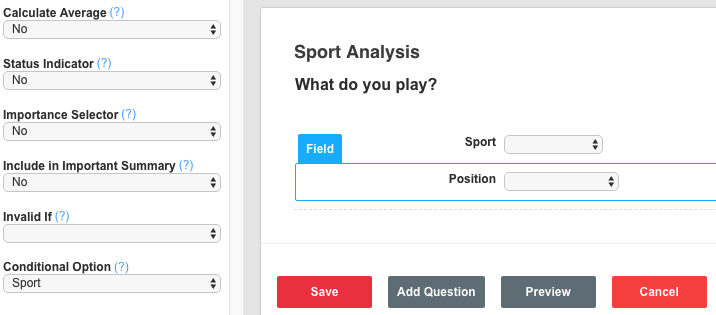
When you have more than one option field in a form, you can choose to make the option list of one option field dependent on the answer given in another option field. This is called a conditional option and requires two settings:
- The Conditional option advanced property of the filtered field is set to the name of the filtering field.
- The option list of the filtered field needs to be set up in a specific way.
In the option list for the filtered field, the options from the filtering field must be listed and followed by a colon, then the relevant options for each filtered field should be listed underneath.
In this example, we have two dropdown fields - one for sport and one for position. The choice of position is dependent on which sport is selected, so we've set up the option list of each field as follows:
| Options for the Sport field | Options for the Position field |
| Rugby union Rugby league Soccer |
Rugby union: Loosehead prop Hooker Tighthead prop Number-4 lock Number-5 lock Blindside flanker Number-8 Openside flanker Scrum-half Fly-half Inside center Outside center Left-wing Right-wing Fullback Rugby league: Prop Hooker Second row Halfback Five-eighth Centre Wing Fullback Soccer: Forward Midfield Defender Goalkeeper |
Notice that some options appear twice in the option list (such as Fullback and Hooker). Teamworks AMS will treat these options as the same value for sorting purposes.
Scoring your options
If you want to write calculations about the data collected using an option field, it's important to score the contents of the option list, which you can do from the Scoring tab.
If an option field has scores assigned, a calculation referencing that field will return the score assigned to the selected option, rather than the option itself. If you want your calculation to return the option instead, you can use the option() function.
For example, a Wellness form may have a field called Fatigue with the following options and associated scores:
- Extremely fatigued (assigned a score of 1).
- Very fatigued (assigned a score of 2).
- Moderately fatigued (assigned a score of 3).
- Slightly fatigued (assigned a score of 4).
- No fatigue (assigned a score of 5).
Then using a separate calculation, you could either:
- Return the score (in a simple calculation) with the following formula:
Fatigue
- Return the option (in a text or option calculation) with the following formula:
option(Fatigue)
When referencing an option field with scores in a dashboard widget, the widget will reference the option names for the field, instead of the scores. In order to display the option scores (e.g. in a Time series chart or a Tile), follow the instructions above to create a simple calculation to return the score and use this calculation field in the dashboard.
Steps to create an option field
- Within a form in the builder interface, select an option field from the sidebar.
- Provide a unique Name for the field.
- Use the Options tab in the sidebar to customize the list of possible options.
- Insert each option on a new line.
- Use the Update button to confirm your list.
- Use the Scoring tab to assign a value to each option, if required. Provide a score for all options and use the Update button to confirm your selections.
If you need to remove all scores, use the Clear all button.
Changing options for a form with existing data
There is a special migration process for modifying the option list once a form is in use. You can use the option migration process to convert the name of an option to another name, remove an option or make two options the same.

The option migration feature is found on the Event forms tool (or the Profile forms tool, if you're modifying an option field in a profile form).

In this example, we want to change the name of a sport from Soccer to Association football, so we've entered the new option name and left the rest of the options the same. Once the Migrate button is used, AMS will update all historical records for this form with the new option value. When people use this form in the future, they'll see Association football on the dropdown list for the Sport field instead of Soccer.
If you are migrating the name of an option used as a filtering field for another option field (as in the example shown above), you will need to manually update the option list of that field to use the new option name.
When you migrate an option field, you should wait for the notification email from AMS which lets you know the migration is complete before doing any other migrations or resaves.
It's also critical that you refresh your browser session before re-opening a form that you've just completed a migration on. If you don't refresh your browser, you'll be shown the pre-migration version of the form. This can lead to inadvertently causing data loss if you then save the old version of the form after a new one has been created by the migration process.